Wednesday, April 29, 2009


How do I search for special characters (e.g. %) in SQL Server?


There are several characters that have special meaning within a SQL query, for example the percent sign (%) in a LIKE query is a wildcard that essentially means "any number of characters can go here." Likewise, the underscore (_) is a wildcard that says "any single character can go here." So what if you are actually looking for a value that contains a literal percent sign? You will end up with bizarre results if you try the following: 
 

SELECT columns FROM table WHERE 
    column LIKE '%%%'

 
Instead, you can try one of the following solutions: 
 

SELECT columns FROM table WHERE 
    column LIKE '%[%]%' 
 
-- or 
 
SELECT columns FROM table WHERE 
    column LIKE '%\%%' ESCAPE '\'

 
The first query 'delimits' the special character with square brackets, telling the engine to treat it as a normal literal character instead of a character with special meaning. The second query uses a custom escape character -- you can use any character you like, just be careful that you aren't also expecting to use it as part of the literal string. 
 
Now, you might be wondering, how do I escape a square bracket? If you have something like this: 
 

SELECT columns FROM table WHERE 
    column LIKE '%[SQL Server Driver]%'

 
The results won't be what you expect, because an opening square bracket is considered a special character. Surprisingly, you can avoid this problem in much the same way, by one of the following two queries: 
 

SELECT columns FROM table WHERE 
    column LIKE '%[[]SQL Server Driver]%' 
 
-- or 
 
SELECT columns FROM table WHERE 
    column LIKE '%\[SQL Server Driver]%' ESCAPE '\'

 
You can do this replacement at the ASP side, before passing the string in, or within the SQL Server code itself.


-Savitur

TIFF attachments may not be shown correctly in OWA 2007 and show RED "X" instead

Issue: In a Microsoft Exchange Server 2007 64-bit standard version environment, using windows 2003 64bit-version. We send e-mail message by outlook 2000 in Rich Text Format (RTF) format and attach with tiff attachment.

We found that the tiff image attachment cannot display correctly. the icon shows as a red "X".

Other attachment icons are shown correctly. The problem also exist when recipient use OWA2007.

Issue description: The icons that represent TIFF attachments may not be shown correctly in OWA 2007

The problem was that Internet Explorer (IE) cannot render TIFF images. It can render JPG, GIF, BMP and etc, but not TIFF. In Outlook 2003 and earlier, Outlook Express, and OWA, all use IE to render HTML. Since IE cannot display the TIFF, we get the red X. Outlook 2007 uses Wordmail to render all messages, and since Word can render TIFF files, the messages are displayed properly.

Workarounds:

1.       Use HTML or Plain Text instead of Rich Text when composing the message.

2.       Change the image format to something supported by IE (GIF, BMP and etc)

3.       Don’t send TIFF’s inside the message body, and attach them in the zip file

Fixes:

·                                 To resolve this problem, install Update Rollup 3 for Exchange Server 2007 Service Pack 1 (SP1) on the Exchange server. For more information, click the following article number to view the article in the Microsoft Knowledge Base:

949870  (http://support.microsoft.com/kb/949870/ ) Description of Update Rollup 3 for Exchange Server 2007 Service Pack 1


Regards,


Savitur Badhwar

Monday, September 15, 2008

Error in Publishing ASP.NET

If you get an error like "Access to the path 'C:\Documents and Settings\username\Local Settings\Temp\~6d4\bin\App_WebReferences.compiled' is denied." when you use the VS2005 | Build menu | Publish Web Site and your site impersonates a user this may help.

Open up Windows Explorer and navigate to the Temp directory specified in the path. In this example, go to "
C:\Documents and Settings\usb00528\Local Settings\Temp". Now right-click on the Temp directory and go to the security tab. Add the user that you are impersonating (usually specified in you web.config) and give the user Read and Write permissions. Now re-try the Publish Web Site menu item and it should publish successfully now. Yeah!


Regards,


Savitur Badhwar

(Computer Systems & Network Administrator)

Custom Control Sensors, Inc.

21111 Plummer Street | Chatsworth, CA 91311

Ph 818.341.4610 x2205 | Fax 818.709.0426

Chatsworth | Burbank | Mexico | http://www.ccsdualsnap.com


"Do all the good you can, by all the means you can, in all the ways you can, in all the places you can, to all the people you can, as long as ever you can" ~ John Wesley


CAUTION - The information contained in this communication is for the exclusive use of the addressee and may contain confidential privileged and non-disclosable information. If the recipient of this communication is not the addressee, or a person responsible for delivering the communication to the addressee, such recipient is prohibited from using this communication in any way. If you have received this communication by mistake, please notify us immediately. Any information related in the foregoing should be independently confirmed with the sender before reliance thereon including that represented to be from Custom Control Sensors, Inc.


Sunday, May 11, 2008

Anaylze Crash Mini Dump in Windows XP

About
So you got a XP blue screen of death (BSOD) and you'd like to have a crack at fixing it? Well hopefully this might help.

Turn On Minidumps

If you havn't already turned on minidumps, go to the Control Panel and follow this steps:
  1. System Icon
  2. Advanced Tab
  3. Startup and Recovery -> Settings
  4. Enable Write an Event to the system log
  5. Disable Automatically Restart
  6. Select the following debugging information:
    • Small memory dump (64 Kb)
    • Small Dump Directory : %SystemRoot%\Minidump
  7. Confirm all and restart the computer.

Crash It

Do whatever to make it crash. In my case it was leave the video encoding running overnight.

Install Tools

If you havn't got the windows debugging tools installed, then install the Microsoft Debugging Tools (Direct Link)

Analyse The MiniDump

To extract useful information out of the minidump file created:
  1. Open a command prompt (Start -> Run -> "cmd")
  2. cd \program files\debugging tools (Or wherever they are installed to)
  3. kd -z C:\WINDOWS\Minidump\Mini???????-??.dmp
  4. kd> .logopen c:\debuglog.txt
  5. kd> .sympath srv*c:\symbols*http://msdl.microsoft.com/download/symbols
  6. kd> .reload;!analyze -v;r;kv;lmnt;.logclose;q
  7. You now have a debuglog.txt in c:\, open it in a text edit (Notepad?).

Post Mortem

Look for the MODULE_NAME and IMAGE_NAME headings. This is the program that caused the error. Sometimes when it's a device driver it means that that device is causing the BSOD and by disabling it or updating the driver your system will run stable. If you don't know what device that name relates to then Google it.

I provide this information for free without any support.

Hope it helps.


Be a better friend, newshound, and know-it-all with Yahoo! Mobile. Try it now.

Monday, March 24, 2008

ASP.NET 2.0 Gridview/Dataview Update does not work

Problems with my GridView/Dataview update, it doesn't update the record in the database, it doesn't generate an error either, it just reloads the page with the previous values.


Check 1:

If you select the GridView in the designer, and select that entry in the Properties box, you can select the correct values.The result should change your source line to look something like the following (in bold):

<asp:GridView ID="GridView1" runat="server" AutoGenerateColumns="False" DataKeyNames="id" DataSourceID="SqlDataSource1">


Check 2:

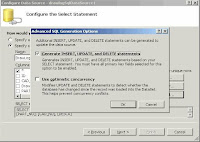
If you have NULL fields in your data and checked the "Use Optimistic Concurrency" option when configuring your SqlDatasource, then the update won't work. Re-configure the SqlDataSource (use the wizard again) and uncheck the "Use Optimistic Concurrency" option. It should work fine afterwards.

Friday, February 29, 2008

Authenticating a Windows User in .NET

Authenticating a Windows User in .NET

When it comes to authenticating a windows user from within a .NET application, a developer has 3 options

  1. Querying Active Directory via LDAP (Lightweight Directory Access Protocol)
  2. Microsoft.Samples.Security.SSPI
  3. LogOnUser API (advapi32.dll)

Personally I prefer the third option. Let me explain why.

Querying the Active Directory is the most common way of performing authentication or at least it seems that way since when you google the subject most of the results point to this solution. An active directory is a directory structure used on Microsoft Windows based computers and servers to store information and data about networks and domains. It is primarily used for online information and was originally created in 1996 and first used with Windows 2000. An active directory (sometimes referred to as an AD) does a variety of functions including the ability to provide information on objects, helps organize these objects for easy retrieval and access, allows access by end users and administrators and allows the administrator to set security up for the directory. So its obvious that AD's sole purpose is not authentication. Hence the frustrated comments you WILL find on various blogs and other web pages on performing authentication using AD. In addition, the active directory feature should be installed on a server to make this work. If its not installed querying the AD amounts to no result.

I must admit that my knowledge on the second solution is much limited. But when going through some solutions in the web I saw that it required some fiddling with windows sockets involving some classes like Socket, TcpListener, etc. I could only imagine what sort of problems you may come across when you try that out in a firewalled environment.

So to be on the safe side I chose to go with the LogOnUser API. IMHO there is not enough documentation to be found in the internet on how to use the Windows LogOnUser API exposed by advapi.dll so I had to depend on trial and error and managed to create a managed wrapper consisting of a set of classes which I mention below. It is possible to perform the following functions with this wrapper.

  • Authenticating a local or domain windows user
  • See whether a windows user is in a specified windows user group
  • List all windows user groups that a certain windows user belongs to.
  • Impersonation may also be possible with some additional lines of coding.

Here's how I got it working,

The first class called 'WindowsAPIDeclarations' contains all the Windows API declarations.

using System;
using System.Collections.Generic;
using System.Text;
using System.Runtime.InteropServices;

namespace libWinSecuritySubSystem
{
internal sealed class WindowsAPIDeclarations
{
internal static Int16 LOGON32_LOGON_NETWORK = 3;
internal static Int16 LOGON32_LOGON_INTERACTIVE = 2;
internal static Int16 LOGON32_PROVIDER_DEFAULT = 0;

internal WindowsAPIDeclarations() { }

[DllImport("advapi32.dll")]
internal static extern bool LogonUser(String lpszUsername, String lpszDomain, String lpszPassword, int dwLogonType, int dwLogonProvider, ref IntPtr phToken);
[DllImport("kernel32.dll", CharSet = CharSet.Auto)]
internal static extern bool CloseHandle(IntPtr handle);
}
}

The second class "AuthenticationService" contains the main AuthenticateUser() method. Remember to replace the string "<YOUR DOMAIN NAME HERE>" with your windows domain name in which you want to do the authentication.

using System;
using System.Collections.Generic;
using System.Text;
using System.Security.Principal;
using System.Runtime.InteropServices;
using System.ComponentModel;
using System.Collections;

namespace libWinSecuritySubSystem
{
public sealed class AuthenticationService
{
public static AuthenticationResult AuthenticateUser(string userName, string password)
{
IntPtr token = IntPtr.Zero;

try
{
string domainName = "<YOUR DOMAIN NAME HERE>";

if (!WindowsAPIDeclarations.LogonUser(userName, domainName, password, WindowsAPIDeclarations.LOGON32_LOGON_INTERACTIVE, WindowsAPIDeclarations.LOGON32_PROVIDER_DEFAULT, ref token))
{
int errID = Marshal.GetLastWin32Error();
throw new Win32Exception(5);
}

WindowsPrincipal principal = new WindowsPrincipal(new WindowsIdentity(token));
WindowsAPIDeclarations.CloseHandle(token);

return new AuthenticationResult(true, null, new AuthenticatedUser(principal));
}
catch (Exception ex)
{
try
{
WindowsAPIDeclarations.CloseHandle(token);
}
catch (Exception) { }
return new AuthenticationResult(false, ex, null);
}
}
}
}

The third class named "AuthenticationResult" contains information regarding the ultimate result of the AuthenticateUser() method.

using System;
using System.Collections.Generic;
using System.Text;
using System.Security.Principal;
using System.ComponentModel;

namespace libWinSecuritySubSystem
{
public class AuthenticationResult
{
bool isAuthenticated;
Exception authenticationException;
AuthenticatedUser user;

internal AuthenticationResult(bool isAuthenticated, Exception authenticationException, AuthenticatedUser user)
{
this.isAuthenticated = isAuthenticated;
this.authenticationException = authenticationException;
this.user = user;
}

public AuthenticatedUser User
{
get { return user; }
}

public bool IsAuthenticated
{
get { return isAuthenticated; }
}

public Exception AuthenticationException
{
get { return authenticationException; }
}
}
}

Last but not least the "AuthenticatedUser" class which contains the functions to get info on the authenticated user.

using System;
using System.Collections.Generic;
using System.Text;
using System.Security.Principal;
using System.Collections;

namespace libWinSecuritySubSystem
{
public class AuthenticatedUser
{
WindowsPrincipal principal;

internal AuthenticatedUser(WindowsPrincipal principal)
{
this.principal = principal;
}
public WindowsPrincipal Principal
{
get { return principal; }
}
public bool IsUserInGroup(string groupName)
{
try
{
return principal.IsInRole(groupName);
}
catch (Exception)
{
return false;
}
}

public bool IsUserInGroup(WindowsBuiltInRole builtInGroup)
{
try
{
return principal.IsInRole(builtInGroup);
}
catch (Exception)
{
return false;
}
}

public Dictionary<string, string> GetGroups()
{
Dictionary<string, string> groups = new Dictionary<string,string>();
IdentityReferenceCollection irc = ((WindowsIdentity)(principal.Identity)).Groups;
foreach (IdentityReference ir in irc)
groups.Add(ir.Value, ir.Translate(typeof(NTAccount)).Value);

return groups;
}

}
}

Additional functions like impersonation may also be introduced as necessary.
Tuesday, October 09, 2007

Remote Administrator v2.2 on Windows Server 2003 Standard x64 Edition

To install Radmin v2.2 on Windows x64 edition:

First install Radmin Server v2.2 on your computer.
Due to how Microsoft has changed its handling of 32bit applications under XP 64bit, the default installer for Radmin does not work properly.
When the installer says to put the r_server into system32, Microsoft re-directs the file to C:\WINDOWS\SysWOW64. Unfortunately, Microsoft was not also smart enough to intercept the service creation call and change that path as well. Evidently on the X64 OS, the service has to be in the C:\Windows\SysWOW64

The following information is to be used at your own risk.
Go to Start -> Run -> Type Regedit and press “Enter” button.
Go to [HKEY_LOCAL_MACHINE\System\CurrentControlSet\Services\r_server]
Look for the Imagepath string that looks like "c:\windows\system32\r_server.exe /service" Change the “C:\Windows\System32” to “C:\Windows\SysWOW64”
Use F3 to search for any occurrences and then you can start your service just fine.
Go to Start -> All Programs ->Remote Administrator v2.2 -> Start Remote Administrator server.

My experience has been on Microsoft® Windows® Server 2003 Standard x64 Edition Version 5.2.3790 Service Pack 1 Build 3790 that the standard install did exactly what it was expected to, placed the r_server.exe in the c:\windows\SysWOW64 directory and correctly installed the service to the same path, but it would not start nor did it generate any logs or errors other than the service reported that it did not start in the time expected.
Evidently on the X64 OS, the service has to be in the C:\Windows\SysWOW64 or it will not start. Once I made the coresponding change to the registry, r_server worked as expected.

Cheers!

File (5GB) Copy Error to external hard drive

Was unable to copy 5GB *.iso file from Windows XP to external hard drive 160GB.
Error: Not enough disk space
 
Solution:
FAT32 does not support files over 4 GB in size.  Reformat the external drive to NTFS, you should be fine.
But, we dont want to do that as other version of windows on FAT32 would not see the drive then.


Check out the hottest 2008 models today at Yahoo! Autos.

Wednesday, September 26, 2007

Backup Exec Backup Job Fail due to an Open File

"Corrupt data encountered" (a000fe36 HEX or e000fe36 HEX) is reported when a backup job fails.


Details:

Final Error Code: a000fe36 HEX (0xa000fe36 HEX) or e000fe36 HEX (0xe000fe36 HEX)
Final Error Description: "Corrupt data encountered. See the job log for details."
Final Error Category: Resource Errors
Error Text In Job Log: "Warning: %File% is a corrupt file. This file cannot verify."

This error occurs when VERITAS Backup Exec (tm) attempts to back up a file that is in use by another application or user.

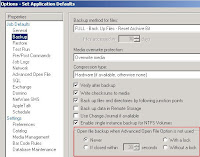
Backup Exec may back up partial data from such a file, but when it is not able to continue the backup of the file, Backup Exec marks the file on the tape as corrupt (Figure 1).

Figure 1

Note: The error refers to the instance of the file on the tape. The file on the hard disk drive may be intact.

Backup Exec Advanced Open File Option (AOFO) can be used to avoid the error. The AOFO component of Backup Exec enables the functionality to perform a complete backup of files which are open through various applications. This is a "paid for" option.

If AOFO is not used, then the following are the workarounds to avoid the error:

1. Click Tools Options Properties Job Defaults Backup. Select Never under Open file backup when Advanced Open File Option is not used (Figure 2).

Figure 2


Select this option to have Backup Exec skip open files if they are encountered during the backup operation. A listing of skipped files will appear in the job log for the backup.

2. Close the respective files during backup

Monday, September 24, 2007

Recover Hard-Deleted Emails with DumpsterAlwaysOn option in Microsoft Outlook

In Microsoft Outlook, there are two types of delete actions: hard deletes and soft deletes. A soft delete is when an item is moved to the Deleted Items folder in the Microsoft Outlook mailbox; the deleted item can be recovered any time before the Deleted Items folder is emptied. A hard delete is when an item is deleted without first putting it in the Deleted Items folder. (Pressing Shift + Delete in Microsoft Outlook executes a hard delete.) Hard deletes also take place if the remote server uses IMAP and doesn't have a Deleted Items folder.

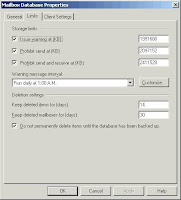
After a hard delete, you may still be able to recover mail items from an Exchange mailbox -- it depends on what the Exchange server's delete retention time is set for. Typically 14 days for emails, contacts or other items and 30 days for mailboxes. You can change the settings on EMC Server Configuration Mailbox Right-click Mailbox Database Properties Select Limit Tab


This functionality is typically only enabled for the Deleted Items folder. Items hard-deleted from Sent Items, Drafts, Outbox or Inbox are usually gone for keeps.

If you want to set delete-recovery for those folders, you need to edit the client registry accessing the Exchange server through Outlook:


  1. Open the registry.


  2. Navigate to HKEY_LOCAL_MACHINESOFTWARE\Microsoft\Exchange\Client\Options.


  3. Add a DWORD value named DumpsterAlwaysOn and set it to 1.


  4. Restart Microsoft Outlook to make the change take effect.

This option can also be rolled out as part of a policy change or made permanent through a .REG file.

Note that even with this option activated, Microsoft Outlook 98 will not support deletions from non-mail folders, such as Contacts and Notes. Microsoft Outlook 2000 and 2003, however, will allow non-mail deleted items to be recovered with this option enabled.

Recover Deleted Items in Outlook

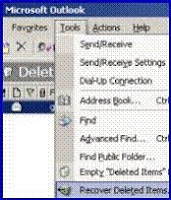
Provided you configured the Windows Exchange mailbox store to hold deleted items, users can restore their own emails from within Outlook 2003. All they have to do is click on the Tools menu, and then select Recover Deleted Items from the drop down menu. See diagram opposite. Naturally, the user can select which emails to recover. Any emails that they select Outlook will miraculously move to the Deleted Items Folder. If the option Recover Deleted Items is deactivated, then go to Deleted Items folder and delete one email for which you already have a backup. After you delete one item, the recover deleted item would be visible with past deleted items.


Slightly surprisingly, users can also recover deleted items using Exchange 2003's Outlook Web Access. In this case, select Options (menu) and Recover Deleted Items is right at the bottom of the page.

Helpful Links:

http://www.computerperformance.co.uk/exchange2003/exchange2003_recovery_deleted_item.htm

http://searchexchange.techtarget.com/tip/0,289483,sid43_gci1024524,00.html

Saturday, September 22, 2007

Backup Exec 11D GRT for Exchange Server

-When using the Granular Restore Technology (GRT) feature to perform Exchange data backups setting the Device to submit the data to a Backup-to-Disk folder is preferred. This will allow an image on disc, which can be used to create restore selections dynamically, and could greatly reduce the time required to restore individual Exchange data items. Make certain the B2d location is on a Local NTFS volume and is not on a NAS, ISCSI or USB attached device.
-After performing the GRT backup to the specified B2d device run a duplicate job to tape in case the space used in the original B2d location may be needed at a later time
-If a Backup to tape must be used in conjunction with the GRT feature, make certain that there is sufficient disk space on a NTFS volume local to the media server to perform the restore operation. Disk space equivalent to the size of the database containing the item, or items, to be restored is required.
-If multiple non-concurrent restore operations of individual items may be required, and the GRT backup data was written to tape, consider performing a set copy operation of the data to a backup-to-disk folder prior to performing the initial restore operation.  This will allow the use of dynamically created selections for individual items and will save a great deal of time in the event that multiple non-concurrent restore operations are required.


Be a better Globetrotter. Get better travel answers from someone who knows.
Yahoo! Answers - Check it out.

Friday, September 21, 2007

Video Series: Exchange 2007 SP1 Standby Continuous Replication (SCR)

Beta 2 of Service Pack 1 Exchange Server 2007 is available for public download and preview for MSDN and TechNet subscribers.

Following is a 5-part blogcast that takes us through the process of enabling SCR, monitoring SCR, and activating an SCR storage group copy using the Exchange Management Shell and other features, such as database portability.

http://msexchangeteam.com/archive/2007/09/13/447006.aspx


Wednesday, September 19, 2007

After performing a complete backup of a Microsoft Exchange 2007 Server, additional backups may fail with an AOFO initialization error.

Exact Error Message
aofo: initialization failure...0xe000fed1: an error occurred querying the writer status

Details:

Backup Exec 11d for Windows Servers version uses Microsoft Volume Shadow Copy Service (VSS) to perform backups of Exchange data. These backups initialize and run the Microsoft VSS provider and Exchange VSS writer which may not properly terminate after the backup job is complete.  Once VSS has gotten into this state, backup jobs will fail with:

AOFO: initialization failure...0xe000fed1: an error occurred querying the writer status.

According to the Microsoft document listed below, possible workarounds include dismounting then mounting the Exchange databases using the Exchange Management Console or stopping and restarting the Microsoft Exchange Information Store service.  Please see the Microsoft document for the details of these workarounds.  In addition, the option of using Windows Backup (NTBackup) may be used as an alternative as well as it does not rely on VSS for Exchange backups.

Microsoft Knowledge Base Article - 930800:
Event ID 9840 is logged when a VSS backup operation fails in Exchange 2007
http://support.microsoft.com/?kbid=930800 


Boardwalk for $500? In 2007? Ha!
Play Monopoly Here and Now (it's updated for today's economy) at Yahoo! Games.

Tuesday, September 18, 2007

Configure Backup Exec Service account to perform Exchange 2007 Mailbox Backup

Details:
In Exchange 2003, the following security roles were available through the Delegation Wizard in Exchange System Manager:

Exchange Full Administrator
Exchange Administrator
Exchange View Only Administrator

Exchange 2007 has the following predefined groups that manage Exchange configuration data:

Exchange Organization Administrators
Exchange Recipient Administrators
Exchange View-Only Administrators
Exchange Server Administrators

Perform the following in order to back up Exchange 2007 Database using Backup Exec:
Make sure that the Remote Agent for Windows Servers is installed on the Exchange server, if the Exchange server is not locally installed on the Backup Exec computer.
Ensure that the Backup Exec service account has Domain Admin and Local Administrative rights.
Verify that the Backup Exec service account mailbox is not hidden.

To configure Backup Exec service account, refer to the following instructions:
1. Go to Active Directory Users and Computers and go to the Users directory. Right-click on the Administrator account and select copy (see Figure 1) and create an account for BACKUP EXEC.
Figure1


2. Go to Services applet and stop all Backup Exec services. Then configure all the Backup Exec services with the new account just created (see Figure2).
Figure2

3. Open the Exchange Management Console.
4. In the Exchange Management Console, select Organization Configuration. (see Figure 3)
Figure3

5. Right click on Organization Configuration and select Add Exchange Administrator. (see Figure 4)
Figure4


6. On the Add Exchange Administrator page, click Browse and select the user that you want to delegate control to.
7. Select the Exchange Server Administrator Role radial button. (See Figure 5)
Figure5

8. Click Add and under Select the server(s) to which this role has access select the servers to which you want to delegate control.(See figure 6)
Figure6


9. Click OK. Click Add.

10. On the Completion page verify that the delegation was successful and click Finish.


Related Documents:

243328: How to remove the "Hidden" attribute from Exchange 2000 and Exchange 2003 mailboxes so that the mailboxes will be available to the Global Address List for backup purposes http://support.veritas.com/docs/243328

287804: Symantec Backup Exec 11d for Windows Servers Sets the Standard for Exchange 2007 Server Data Protection http://support.veritas.com/docs/287804

Symantec Backup Exec 11D - Exchange 2007:- Access Denied

Results Found for Error Message: V-79-57344-33928
Items 1 to 11 of 11 by publish date.

290764: After upgrade to Backup Exec 11d for Windows Servers build 6235, attempt to access a public folder fails with the error: "V-79-57344-33928 - Access is denied" - 09/04/2007

289815: Access denied is reported while running backups to disk, or restores from tape, of Exchange 2003 from an x64 bit media server. - 08/13/2007

287464: A Backup Exec 11d Exchange Information Store (IS) backup to a Backup-to-Disk Folder fails with the error: '-546 The log file sector size does not match the sector size of the current volume. ' when the Granular Restore Technology feature is enabled. - 08/03/2007

289970: Backup of Information Store in Exchange 2007 fails with error "Unable to complete the operation for the selected resource using the specified options. The following error was returned when opening the Exchange Database file: '-514 The version of the log file is not compatible with the ESE version" - 07/26/2007

266178: "Access is denied" (a0008488 HEX or e0008488 HEX) is reported when a job fails - 07/24/2007

289649: Backup of Microsoft Exchange 2007 Information Store fails with error "V-79-57344-33928 - Access Denied. Cannot backup directory mailbox database and its subdirectories" - 06/25/2007

289123: Automatic recreation of user's mailbox account fails during restore of Exchange 2007 using Backup Exec 11d for Windows Servers Agent for Exchange - 06/19/2007

289239: Using the 11D Remote Agent for Linux and UNIX Servers, attempts to browse a directory known to have contents fails to show those contents. Also, running a backup of the directory fails with a generic access is denied error. - 06/13/2007

286144: Performing an Exchange Information Store Backup with the "Enable the restore of individual mail messages and folders from Information Store backups" selected, AND the backup job is directed to TAPE, results in a job status of failed and Access is Denied is reported in the job log. - 12/26/2006

276361: The Backup Exec Remote Agent for Linux/UNIX Servers is unable to browse directories on remote Linux/UNIX computers with filenames containing non EUC encoded characters. - 12/15/2005

256057: Common Job Log Error Codes (with Error Description) in Backup Exec 9.x, 10.x and 11d - 12/09/2003

Monday, September 17, 2007

New Exchange Server 2007 mailbox stamped as legacy mailbox

If you use the Exchange Server 2003/2000 extensions to Active Directory Users & Computers (ADUC) console to create mailboxes residing on Exchange Server 2007 servers, these mailboxes get stamped as legacy mailboxes.Exchange Server 2007 mailboxes should be created using the Exchange (2007) console or shell.To remove the legacy tag from mailboxes created using ADUC, use the following command:
Set-Mailbox "First Lastname" -ApplyMandatoryPropertiesThis is documented in KB 931747: A mailbox that is located on an Exchange Server 2007 server may be identified as a legacy mailbox in Exchange Server 2007.To get a list of legacy mailboxes:

Get-Mailbox where {$_.RecipientTypeDetails -eq "legacymailbox"}Note, not all legacy mailboxes reside on Exchange Server 2007 servers, so it's not a good idea to use the ApplyMandatoryProperties command to all of these. Mailboxes residing on Exchange Server 2003/2000 servers are also legacy mailboxes, and you may see some mailboxes moved from Exchange Server 2003/2000 servers carry this tag as well.